If you’re a beginner on the guitar then learning your basic chords is essential. They’re used in countless songs and form the foundation for even more advanced chords and techniques.
Yes, I know it’s much more fun to try and go straight into learning solos and riffs. If I’m honest that’s exactly what I did!
And you should keep doing that too! You don’t want to lose the fun and enjoyment from playing.
But having the basics down will help you build a strong foundation that will only serve to help as you grow and learn more. It may seem a little dull and boring now but will pay off in the long run.
All you need to do is set aside 10 minutes to practice them each day. Make it part of your routine and it won’t take long until you can play them without thinking.
So, let’s go through the essential chords every guitarist should know, how you play them as well as tips for practicing and really mastering.
Basic Guitar Chords for Beginners
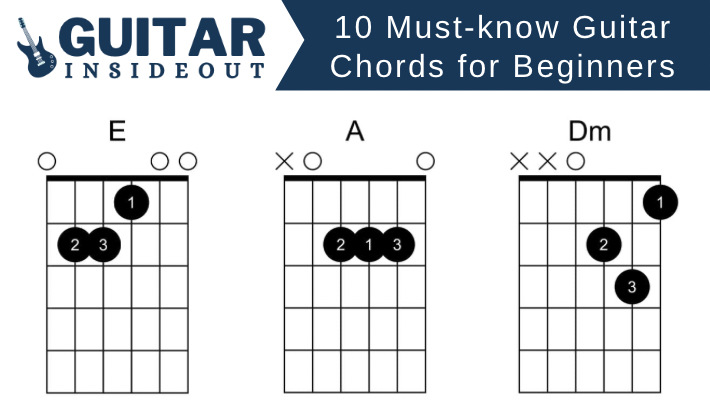
The basic chords as a beginner you should know are A major, D major, E major, C major, G major, A minor, E minor, D minor, B7 and F major. If you only learn these basic chords you will be able to play thousands of songs.
In fact if you only learned the first 6 or 7 of that list you could still play thousands of songs! But the extra few are worth learning early on and will open up your playing even more.
So, let’s get started!
A Major Chord

The A major chord is often one of the first chords beginners learn and a good place to start. The A chord uses 3 fingers, all of them at the 2nd fret.
There are 3 different fingerings you can use to play the A chord, including a barre with just one finger. But we will only focus on the most common one here.
So all the fingers are placed on the 2nd fret. Your first finger goes on the third string, your 2nd finger on the fourth string and your 3rd finger on the second string.
You leave the first and fifth string open (no fingers on them) and you don’t play the sixth string at all.
It can be a little tricky getting all 3 fingers into that small area but don’t be discouraged. Keep an eye on your 3rd finger and that it doesn’t touch the first string.
D Major Chord
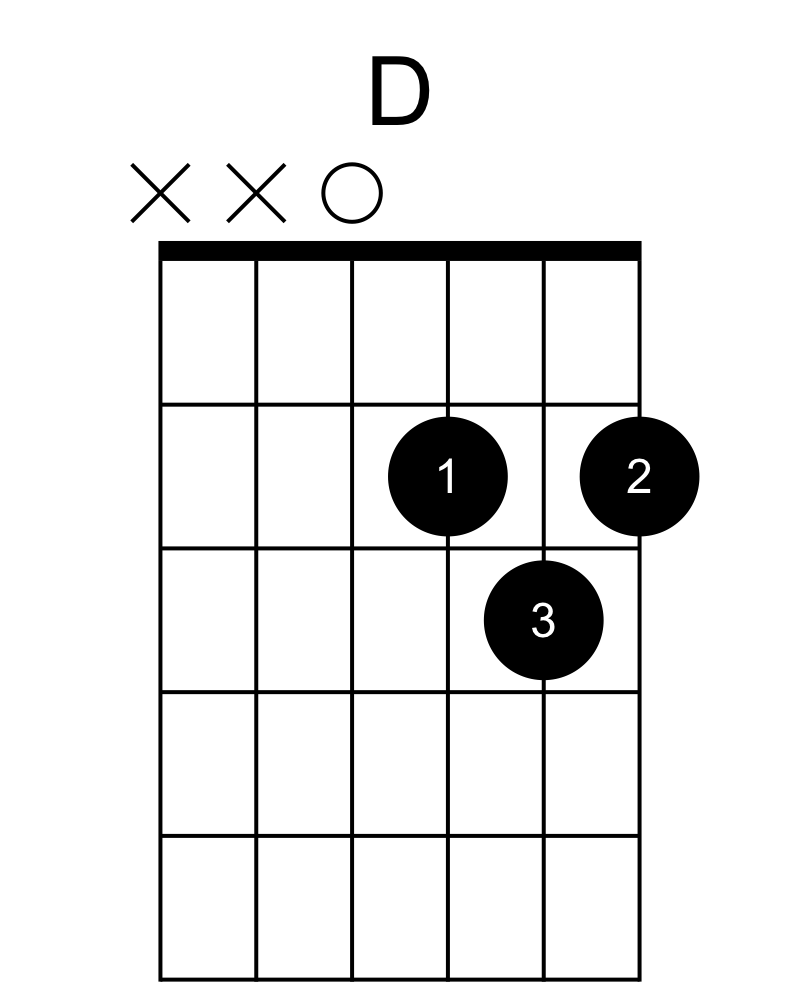
The D Chord is another one of the basic chords you will want to get mastered early on. For the D chord your fingers will be on the 2nd and 3rd frets.
Put your 1st finger on the third string at the 2nd fret, your 2nd finger on the first string on the 2nd fret and your 3rd finger on the second string on the 3rd fret.
For the D chord you shouldn’t play the two thickest strings. Only play the strings your fingers are holding down (the G, B and E strings) and the open string above them, which is the D.
The X on the chord diagram indicates you don’t play the string it is above. In this case it’s those two thickest strings, the E and A strings.
So you’re only strumming 4 of the 6 strings.
E Major Chord
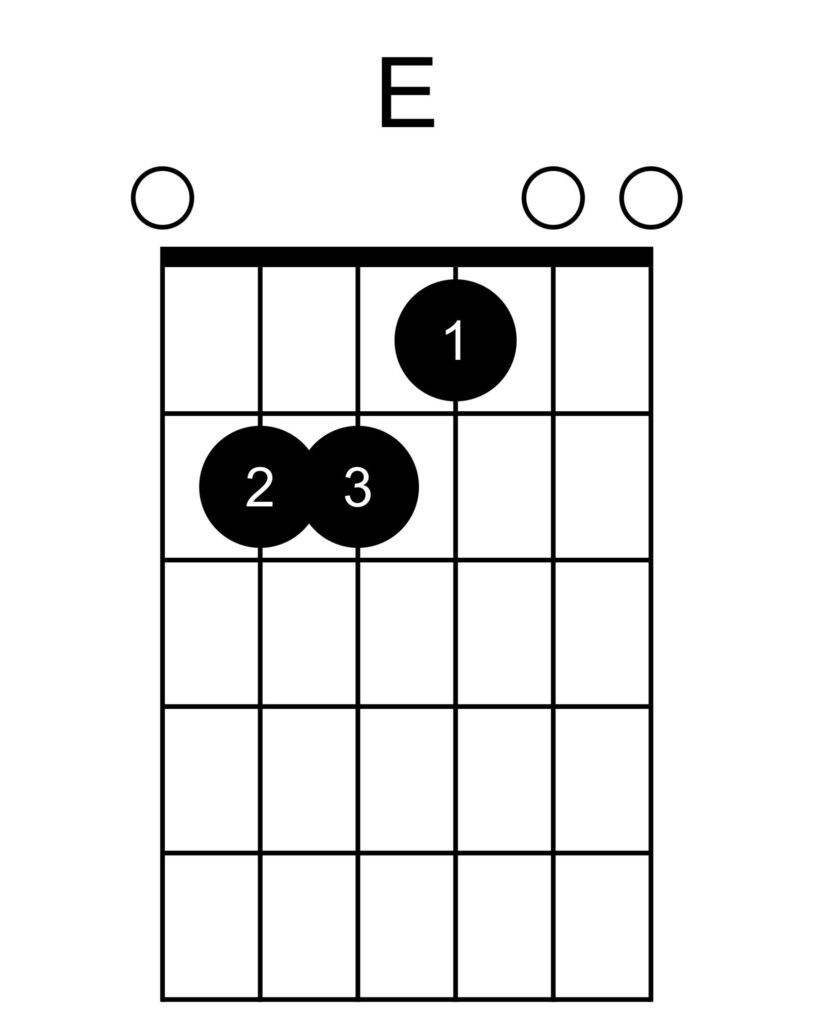
Next up is the E chord and after you feel comfortable with this one and the previous two you’ll be in a position to play some songs (once you’ve nailed your transitions between chords). So that should hopefully keep you motivated if you’re finding learning these chords a little dull.
Again we are using 3 fingers. Put your 2nd finger on the fifth string at the 2nd fret, your 3rd finger on the fourth string at the 2nd fret and your 1st finger on the third string at the 1st fret.
When playing the E chord you leave the other strings your fingers aren’t on open and strum every string. This should make it a little easier as you don’t have to think about which string to start your strumming from or which to avoid hitting.
C Major Chord

The C chord is a little more difficult than the first 3 chords we’ve covered as it requires a bit more of a stretch. Don’t rush it and don’t be put off if you’re having a difficult time at first.
The C Chord is one of the most common chords and crops up all the time in songs. So it’s important to get down.
Your 1st finger goes on the second string at the 1st fret, your 2nd finger on the fourth string at the 2nd fret and your 3rd finger on the fifth string at the 3rd fret.
If you’re finding it near impossible to make the stretch or play cleanly then you can try moving your thumb from pointing up straight on the neck to more of angle towards the head of the guitar. That should help you stretch a bit further
G Major Chord
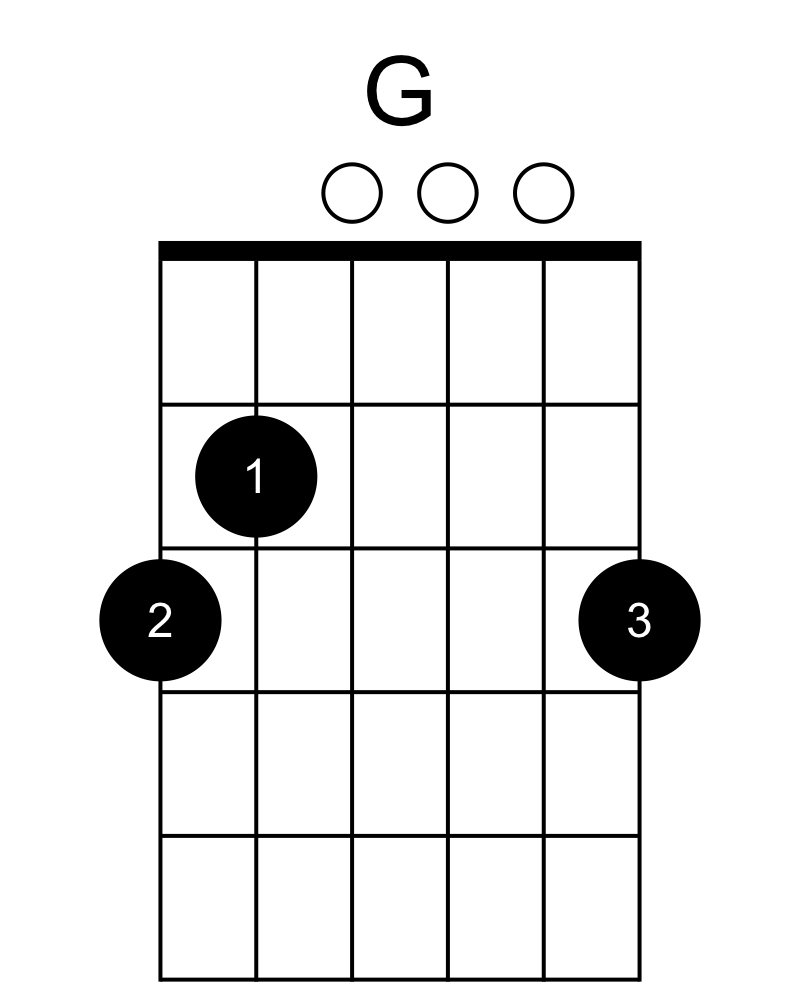
The G chord will require another big stretch. You might want to think about doing some finger stretches and warmups before attempting it if you are really struggling.
There are a few different ways to play the G chord but I think this is the best to learn first. You can play it with 4 fingers which actually I prefer the sound of (it’s sort of fuller) but if you’re a beginner this way will be easier.
So, it’s your 1st finger on the fifth string at the 2nd fret, 2nd finger on the sixth string at the 3rd fret and you third finger on the first string at the 3rd fret.
That stretch with your 3rd finger to the sixth string is going to be hard at first! Persist though and you will definitely get there.
A Minor Chord
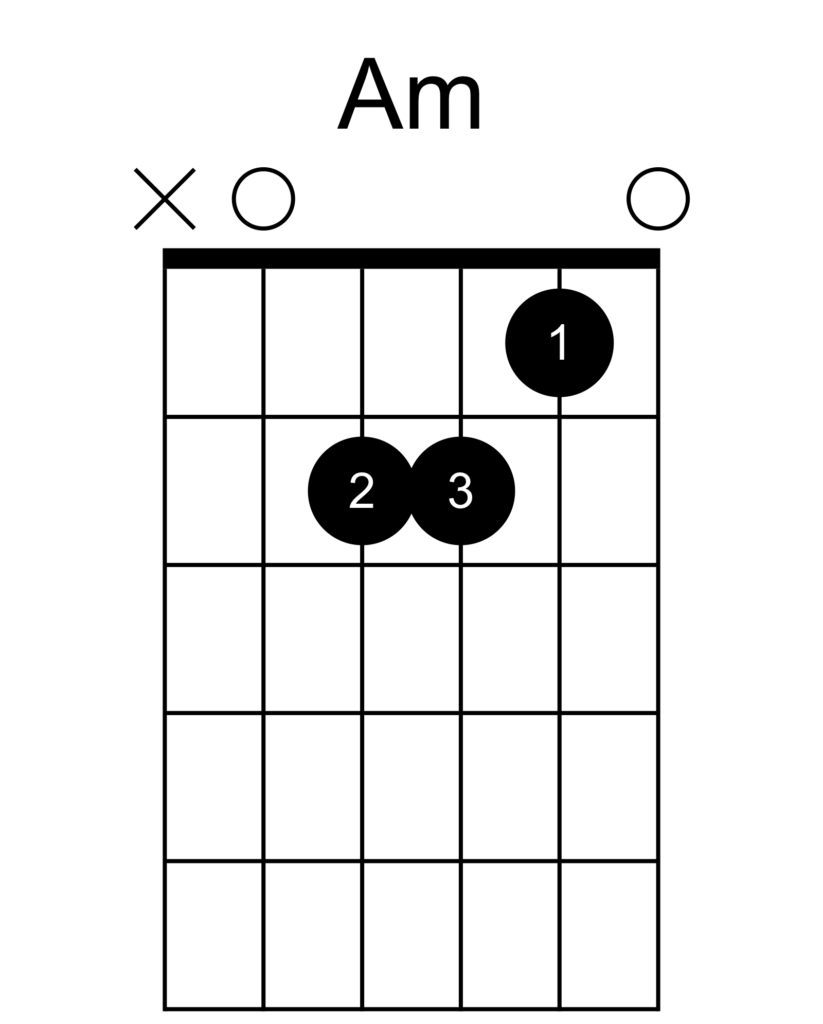
We’re onto the minor versions of chords now. You’ll be able to differentiate them when they’re written from their major versions by the little ‘m’ after the chord letter. So A minor is written as “Am”, D minor “Dm” and so on.
If you have already got the E chord down then A minor should be simple. As you can see they’re identical shapes just played on different strings.
E Minor Chord

E minor is arguably the easiest chord on this list. It only uses 2 fingers, which after the stretches of G and C should be a breeze for you.
You can play it with a couple of different fingerings. The first is the most common with the 2nd finger on the fifth string at the second fret and the 3rd finger on the fourth string at the 2nd fret.
But you can also use the 1st and 2nd fingers in the exact same place and shape. Knowing and being able use both will be helpful when you are playing songs and one is more suitable than the other to move to the next chord.
D Minor Chord
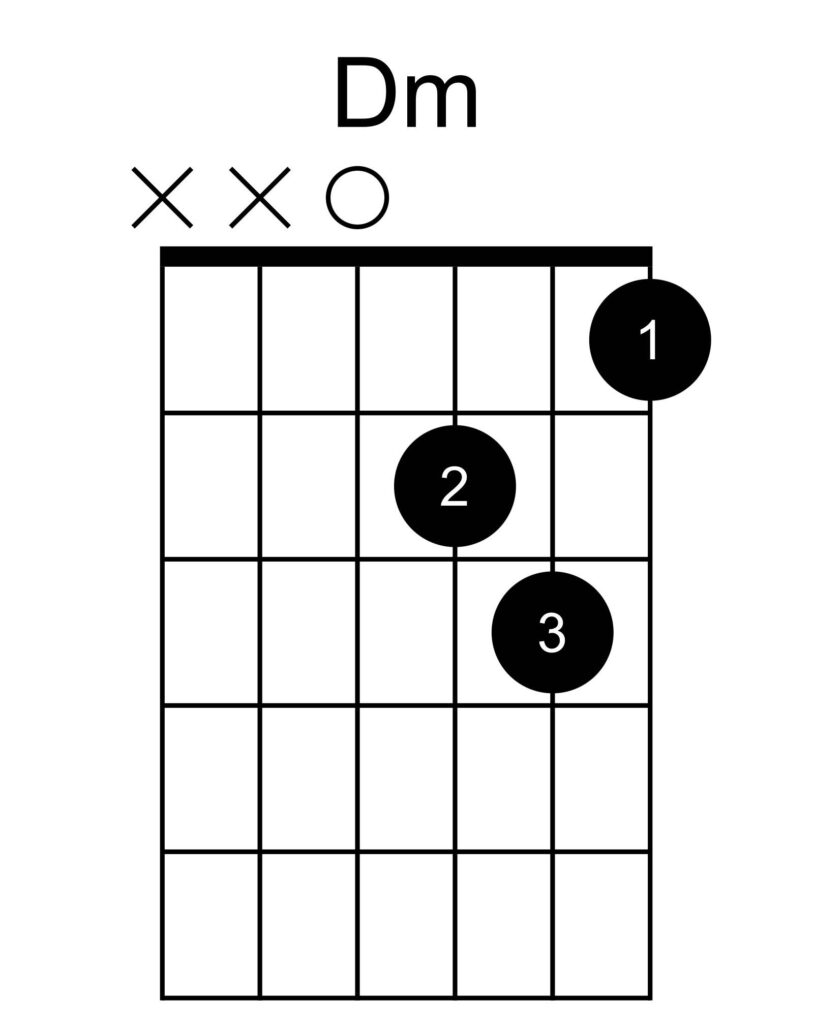
D minor is the most challenging of the 3 minor chords we will cover here. The hand position is slightly different and you might find yourself muting other strings with your fingers. But it’s not too bad and shouldn’t give you that much trouble with a little practice.
The regular way of playing Dm is with the 1st finger on the first string at the 1st fret, the 2nd finger on the third string at the 2nd fret and the 3rd finger on the second string at the 3rd fret. But if that is too much of a stretch then you can swap the 3rd finger for your 4th finger (pinky) to make it easier.
B7 Chord
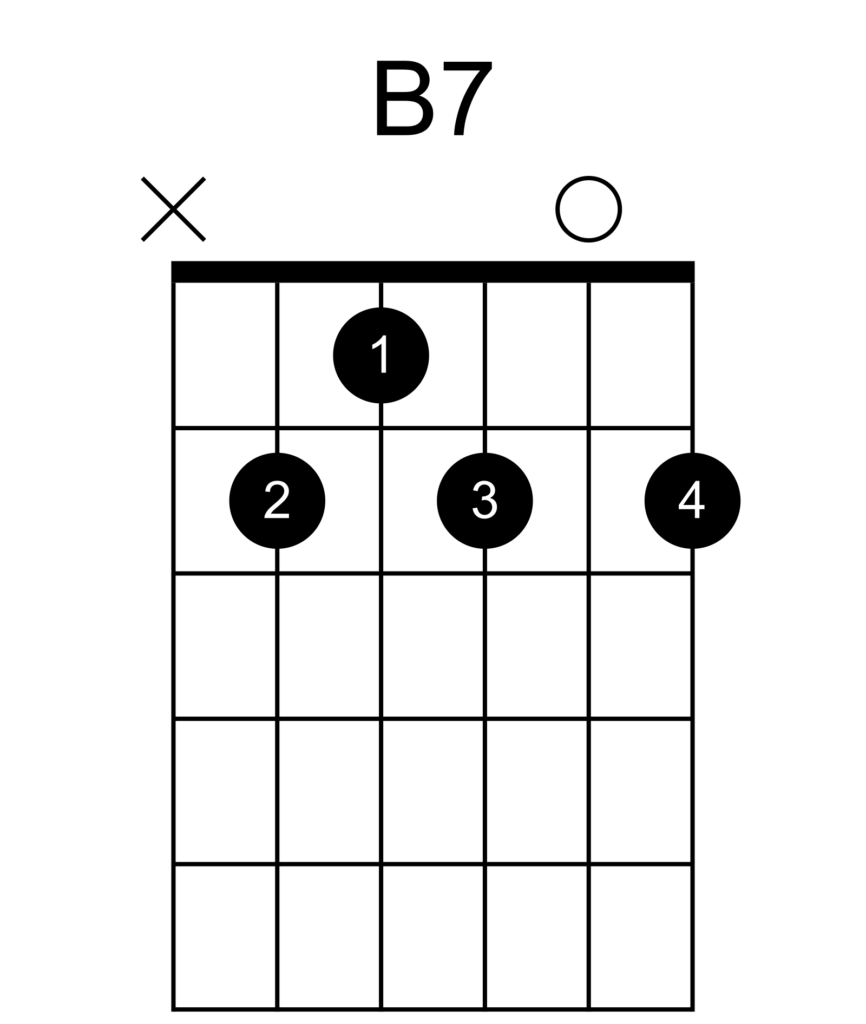
Oddly I always found the B7 chord the hardest out of the 10 listed here. But a lot of people seem to find it relatively easy.
I think the fingering is quite awkward and the pinky needs to have developed a decent amount of strength. But I may have just been a bit of weakling!
See more ways to plays the B7 chord
F Major Chord

Oh no, the dreaded F Chord! The scourge of virtually every beginner. It has a bad reputation because when you’re starting out and new to the guitar it’s a nightmare to play.
It’s the first (and only) barre chord here and probably easier to tackle on an electric guitar if you have one. If not then it’s not a problem, it’s just the lighter gauge strings and lower action on an electric make it a little less painful when starting out.
A quick tip: try to roll and turn your first finger on its side when barring rather than having it completely flat. This should help to hold the strings down.
Remember: very people get it quickly or without some pain and struggle. So if you find yourself having trouble with it don’t get upset. You’re going through what pretty much everyone who’s ever learnt to the play the guitar has at some point.
How to Read Guitar Chord Charts
If you’re not familiar with the chord diagrams used in this list then here’s how to understand them.
The guitar strings are represented by the vertical lines on the charts. The line on the furthest left is the low E string and the line to the furthest right is the high E string.
The horizontal lines represent the frets on the guitar. And the top of the box is nut which allows you to know which fret you are at (some chord diagrams will have the fret number on them too).
The numbers in the circles show you which finger’s you should use in the fret they are in.
- 1 – 1st finger/index finger
- 2 – 2nd finger/middle finger
- 3 – 3rd finger/ring finger
- 4 – 4th finger/little or pinky finger
- O – open string
- X – don’t play the string
Tips for Playing Chords
If you are having a hard time with one or more of these chords then the following tips should help to get you there.
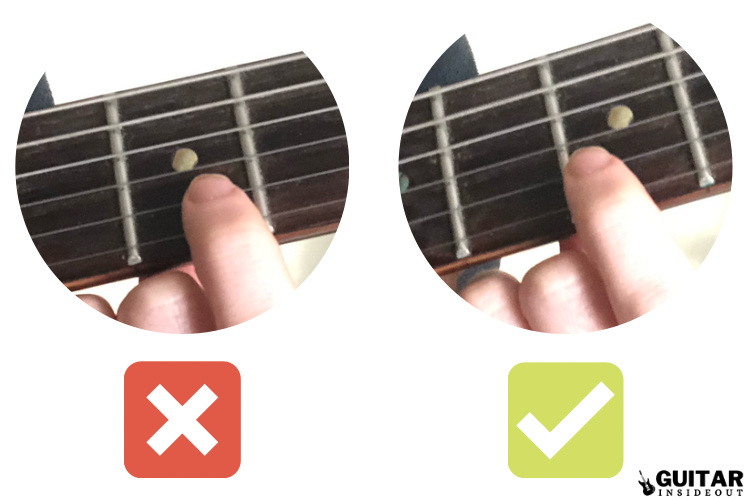
Fingers Behind Frets
You will want your fingers to be just behind the frets when holding the strings down. This is because it’s easier to hold the string down the nearer to the fret you are.
Although you should avoid putting your finger directly on the fret itself.
Thumb Position
Your thumb position is far more important than you probably realize. If you have your thumb over the neck, under it or off at a strange angle it’s going to have a real impact on how easy these chords are.
You want to keep your thumb behind the neck and straight. Ideally aim for it to be straight behind your second finger.
Finger Tips
As a beginner it’s best to try and use the tips of your fingers for holding the strings down. With time you’ll use the pad more often and tip will be used to mute other strings but when you’re new to the guitar it’s better to start with the finger tips.
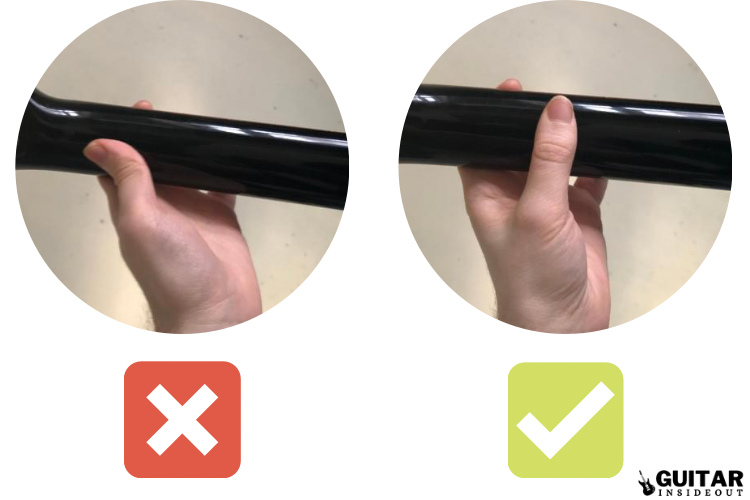
Palm Position
You don’t want your palm touching the neck at any point. Whichever hand you are using to fret with – the palm of that hand shouldn’t touch the neck.
Don’t Press too Hard
It’s understandable if you feel the need to press down really hard when you’re a beginner. You’re still building up strength in your fingers and developing calluses.
But you don’t need nearly as much pressure on the strings as you think. A good tip is to press down on the string so you’re fretting the note. Then gradually lessen that pressure until the note is muted.
You then know that you only need slightly more pressure to get the that string ringing again and that should be the amount of force you’re aiming for when fretting. It should be noticeably less than you started with.
You’re basically looking for the sweet spot between enough pressure to fret the note properly and not enough so that it’s muted.
Hi Andy!
Thanks for a very nice and instructive site.
I appreciate your kindness very much as I’m a beginner, although I played little when I was young.
Many thanks
Mac
Hi Mac!
Thanks for the kind words! I’m really glad you’re finding the site helpful and I hope you’re making some good progress now that you’re playing again.